miércoles, 13 de mayo de 2015

Tortilla de patatas al microondas ::: Microwave spanish omelette

Nuestra versión de la tortilla es un poco más sana que la receta tradicional al no freír las patatas y la cebolla. He decidido hacer un paso a paso para mis compañeras, que me han preguntado varias veces, y de paso compartir la receta con quien le interese. ¡Qué aproveche!
 
Ingredientes:
- 3 cebollas pequeñas
- 2 patatas grandes
- 6 huevos pequeños orgánicos
- Un poco de leche
- Aceite de oliva
- Sal
 
Elaboración:
1) Trocear la cebolla, salar y echarla en una fuente pyrex con tapa a la que previamente le habremos echado unas dos cucharadas de aceite de oliva. Remover bien para que la cebolla quede cubierta con el aceite, tapar y ponerla al microondas a máxima potencia mientras pelamos las patatas. En nuestro caso, la hemos dejado unos 5 minutos y medio en nuestro microondas de 750 w.
 
 
Our spanish omelette recipe is slightly healthier than the original one as we do not deep fry the potatoes or the onions. I have written this step by step tutorial for my work colleagues and share it at the same time with whoever is interested. Enjoy!
 
Ingredients:
- 3 small onions
- 2 large potatoes
- 6 small organic eggs
- A dash of milk
- Olive oil
- Salt
 
Preparation:
1) Dice the onions, season and add them to a pyrex glass casserole with a couple of tablespoons of olive oil. Stir until the onions are covered in oil, put the lid on and microwave on maximum power while you are peeling the potatoes. In our case it took 5 and half minutes on a 750 watts microwave.


2) Trocea y sala las patatas, añádelas a la fuente removiendo para que todo quede bien mezclado. Puede que tengas que echar un poco más de aceite. Se trata de que la mezcla quede cubierta de aceite pero sin empaparla. Además hay que tener en cuenta que estamos cocinando esta receta para intentar hacerla más sana, de lo contrario bien podemos elegir el método tradicional. Vamos a cocinar la mezcla a intervalos de 5 minutos, sacando y removiendo la mezcla cada vez. A nosotros nos llevó unos 15 minutos en total. Hay que comprobar que la patata quede blandita, no hay nada pero que una tortilla con la patata cruda.
 
 
2) Dice and season the potatoes, add them to the casserole stirring with the onions. You may need to add a little bit more of olive oil aiming to cover but not soak the mixture. Keep in mind that you are trying to cook a healthier version of the recipe, otherwise you may stick to the traditional one. Put the lid on and microwave on 5 minutes intervals, checking and stirring after each interval. Once the potatoes are soft you are ready for the next step. It took us about 15 minutes in the microwave. I am going to stress that the potatoes have to be well cooked and soft, otherwise the final texture of the omelette is not going to be very nice.


3) Destapa y deja enfriar un poco (unos 5 min). Prepara una sartén con un par de cucharadas de aceite. Bate los huevos con un chorrito de leche y sal. Añade los huevos a la mezcla y remueve. En nuestro caso hemos añadido 6 huevos porque los orgánicos son pequeñitos.
 
 
3) Remove the lid and let the mixture cool down for a few minutes (about 5). Get a pan and add a couple of tablespoons of olive oil. Whisk the eggs with a dash of milk and season. Add the eggs to the mixture and stir. We have used 6 eggs as the organic ones are quite small.


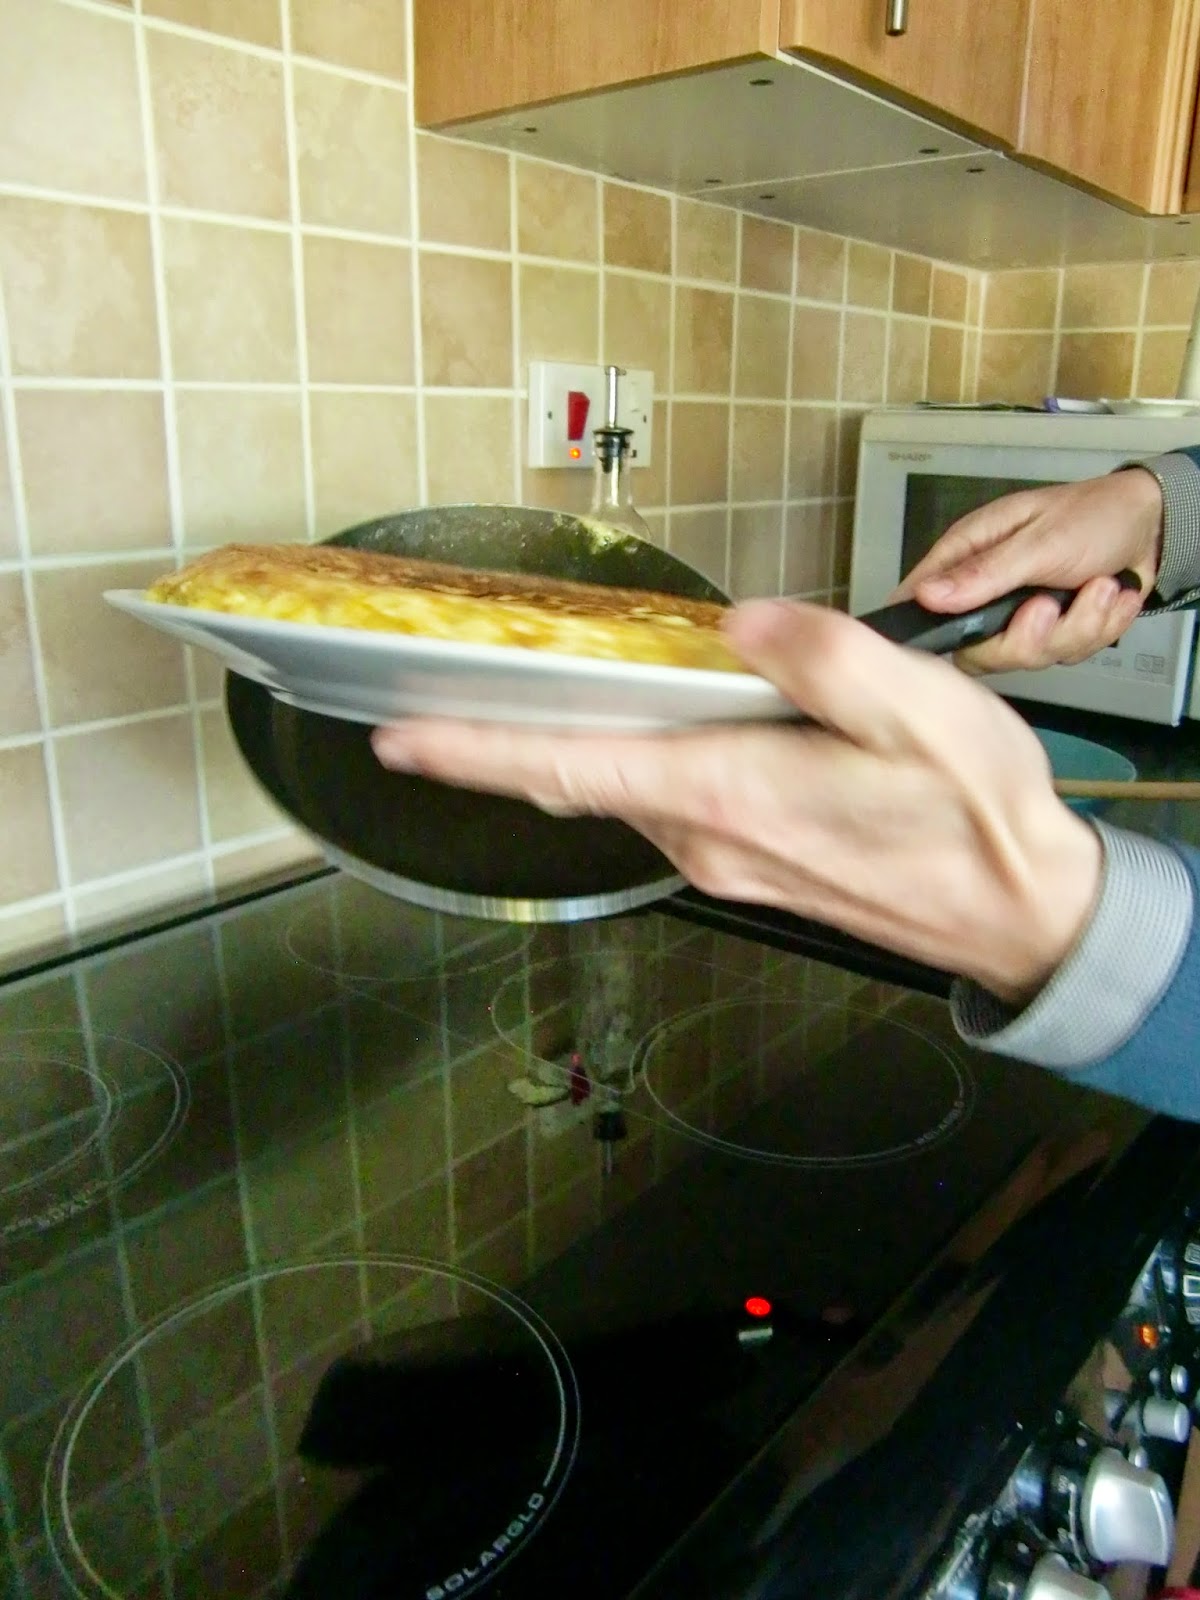
4) Calienta la sartén a fuego medio y vierte la mezcla. Dale la vuelta cuando los laterales y la parte inferior estén cuajados (unos dos minutos). Teniendo en cuenta que mis compis son inglesas voy a explicar detalladamente cómo dar la vuelta a una tortilla y como no me cuesta nada lo voy a incluir en la versión en castellano por si acaso. Primero hay que asegurarse de que la tortilla no está pegada a la sartén, si este es el caso despegar con una espátula de madera. Apartar del fuego y poner un plato llano sobre la sartén. Colocar la mano sobre el plato mientras con la otra se sostiene la sartén y girar boca abajo. Una vez tenemos la tortilla en el plato volver a deslizarla en la sartén tal y como está. La otra cara de la tortilla se va a cuajar más rápido que la primera, así que nosotros volvemos a darle la vuelta al minuto. Dependiendo de lo cuajado que le guste el huevo a cada uno se dan más o menos vueltas. Nosotros solemos darle unas 6 vueltas para quede bien cuajada y no se queme.
 
 
4) Heat the pan (medium heat) and pour the mixture in, you may have to shake the pan carefully to distribute the mixture evenly. Once the bottom and the sides are set, see pictures, it is time to turn the omelette (about 2 minutes). Prior this, check that the omelette is not stuck to the pan, in which case you can unstick it carefully with a wooden spatula. How to turn an omelette: remove the pan from the heat and put a plate on top of the pan holding it in place with your hand whilst the other is holding the pan. Turn it upside down and slide the omelette back in the pan. I hope the process is clearer from the pictures. Bear in mind that the other side of the omelette is going to cook quickier than the first, so you may have to turn the omelette again in about another minute. Depending on how set you like your eggs you will have to turn the omelette less or more. We tend to turn it about 6 times to have the eggs well set and prevent burning the omelette.


Y ya tenemos nuestra tortilla lista. Se puede comer bien fría o caliente, cuestión de gustos. Se puede calentar sin problema en el microondas en caso de que queráis llevarla al trabajo como hacemos nosotros. Solemos partirla y congelamos los trozos que no nos vamos a comer. Se deja la noche de antes en la nevera para que descongele.
 
Buen provecho y hasta pronto
 
 
Ta dah! Our omelette is done. You can eat it straight away or it is also good cold. It is great for lunches and you can reheat it in the microwave if you like. We tend to freeze a couple of portions that you just have to leave in the fridge overnight to defrost.
 
Enjoy and see you soon


domingo, 22 de marzo de 2015

Funda para máquina de coser ::: Sewing machine cover

Llevaba tiempo utilizando la horrible funda de plasticucho que venía con la máquina de coser, que además tiene un agujero para el asa por donde le entra polvo, vamos que ni siquiera hacía su función. Total, que después de ver fundas monísimas y curradísimas al final me decidí por este tutorial que encontré en pinterest y de momento me da el apaño y queda mucho mejor que la anterior.
 
I have been using the cheapo plastic cover that came with the sewing machine , which also has a hole for the handle where the dust gets in , so it wasn't even fit for purpose. Anyway, after seeing lots of cute and intricate covers, at the end I decided on this tutorial I found on pinterest which does the job and looks much better than the last.


Para simplificarlo no le puse cinta al bies, se cose en una tarde. Las dos telas, tanto la principal como la de los bolsillos, son de Ikea. Aquí os pongo otra foto para que se aprecie el bolsillo. La verdad que vienen muy bien, en un bolsillo he metido todas las patillas extras y en el otro unas tijeras y el descosedor.
 
To simplify it I didn't apply bias binding, it can be sewn in an afternoon. Both fabrics, the main and the pockets one, are from Ikea. Here it is another picture where you can see the pocket. They come really handy, in one pocket I keep my extra pressing feet, and in the other a pair of scissors and the seam ripper.


Hasta pronto

See you soon

jueves, 12 de febrero de 2015

Alfombra de cuerda a crochet El Costurero::: Crocheted rope rug El Costurero

Sigo terminado tareas  pendientes y parece ser que tiempo medio de finalización de proyectos son dos años jeje. En 2013, gané un sorteo de la revista El Costurero que me hizo mucha ilusión porque no suelo tener mucha suerte en el azar, será que me quieren mucho. El premio fue 4 madejas de cuerda y de regalo sorpresa incluyeron un mega-ganchillo. Anabel se portó genial durante todo el proceso y me envió unas cuerdas turquesas preciosas. El patrón de la alfombra era un extra del número 3 de su revista. He aquí los ingredientes:
 
I am still finishing projects and apparently my average completion time for them is two years lol. In 2013, I won a giveaway from the amazing magazine El Costurero and I was thrilled because I do not usually have much luck on these things. There is a say "Lucky at cards, unlucky in love", and it seems that I have been incredible lucky in love so I am not complaining. The prize was 4 skeins of rope and as a surprise gift they included a jumbo crochet hook. Anabel was great during the whole process and she sent me a lovely turquoise rope. The rug pattern was an extra from the magazine number 3. Here are the ingredients:


La cuerda es de Sacocharte, el ganchillo de Crochetismos. La revista es totalmente recomendable, así como su blog. Os muestro la alfombra que ya tenemos colocada en el dormitorio.
 
The rope is from Sacocharte and the crochet hook from Crochetismos. The magazine is great, I would definitely recommend it as well as their blog. This is the rug that has already a place in our bedroom.
 
 
Hasta pronto y gracias de nuevo al Costurero :)
 
See you soon and thanks again to El Costurero :)

viernes, 30 de enero de 2015

NYC quilt

Yo voy a mi ritmo, tortuga, pero ritmo al fin y al cabo. Cuando fuimos a NYC en 2012 compré telas pensando en hacer un quilt como souvenir de recuerdo para nosotros. Creo que lo empecé ese mismo año y unos cuantos más tarde, hace una semana exactamente, en 2015 lo he terminado. Durante este tiempo han pasado muchas cosas, irnos al extrajero y boda entre otras, así que no me preocupa tardar años en terminar algo. Lo principal es disfrutar con el proceso y terminarlo en algún momento. Empecemos con el principio, las telas que compré en The City Quilter, una pasada de tienda que recomiendo visitar si vas a Nueva York y te interesan las telas, tiene hasta su museo de quilts adyacente. Podéis verlas en el post que escribí en su momento aquí. Me basé este el libro que también compré durante el viaje.
 
I go at my pace , turtle one, but pace after all . When we went to NYC in 2012 I bought fabrics thinking about making a quilt as a souvenir to remember for us. I think I started working on it that year and a few ones later, exactly a week ago , in 2015 I have completed it. During this time a lot has happened , moved abroad and wedding among others, so I do not worry about taking years to finish something . The main thing is to enjoy the process and complete it at some point. Let's start with the beginning, the fabrics I bought at The City Quilter , an amazing shop that I would recommend if you visit New York and have a fabric interest. You can see them in the post that I wrote here. I was inspired by this book that I also bought during the trip.


Algunos bloques son sacados del libro y otros me los preparó Sari, profesora de Maspatch sin la que no hubiera sido posible hacer este quilt.

Some of the blocks are from the book and Sari , my teacher from Maspatch, got them for me. It would have been imposible to make the this quilt without her.


La tela trasera la compré en Cardiff en Butterfly fabrics, no es que fueran especialmente simpáticos pero tienen una buena selección de telas de patch y de costura en general. Pongo una foto más de cerca para que se vea mejor, son palabras relacionadas con el patchwork.
 
I bought the back fabric at Butterfly fabrics in Cardiff, I cannot say that they were quite friendly but they have a nice selection of patchwork and dressmaking fabrics. This is a closer picture, it is printed with patchwork vocabulary.


Hasta pronto

See you soon


jueves, 15 de enero de 2015

Regalos ::: Gifts

Estamos teniendo un baby boom en nuestro entorno y yo estoy intentando sacar tiempo para hacerle algún regalillo handmade a los bebés. Para Anna he hecho un cambiador con una bolsa compañera para guardar un par de pañales y las toallitas.

We 're having a baby boom around us and I am trying to find time to make some handmade gifts for the babies . For Anna, I made a changing mat with its bag to fit a couple of diapers and the wipes.


El cambiador está hecho con una toalla de lavabo, una capa de guata y tela de algodón comprada en Abakhan.

To make the changing mat I used a hand towel, batting and cotton fabric bought at Abakhan.


También le hice un gorrito y unos patucos de crochet. El patrón del gorrito lo encontré en Pinterest y para los patucos me basé en unos de Mollie Makes añadiendo la pulsera.

I also crocheted a hat and a pair of booties. I found the hat pattern on Pinterest and I based the booties on un from Mollie Makes adding the strap.


Hasta pronto
 
See you soon